Showing posts with label chipboard and stickers. Show all posts

Thursday, August 30, 2012

New CTMH Paper Kits

It's hard to decide...But here's my top picks for our new paper kits and WOTG.

Some of you know how much I love Halloween decor and paper...well and of course all the fun embellishments that go with it!  "Moonlight" is our new Halloween Kit. With its whimsical owl paper, dramatic purple patterns and black and cream distressed stripe you will add interesting flair to all your pages.  Use it for Halloween, fall or anything in between! Many of the patterns and colors in this kit are perfect for any theme.
I love these coordinating brads & embellishments. Aren't they a riot! Spiders & skulls and yes my personal favorite...flourishes!


Gotta love these papers! I can see using the black and cream distressed stripe on my soccer pages & the green damask for fall. This kit is very versatile. Check out the matching chipboard! Isn't it fantastic! So many fun embellishments to add to your pages and make them "Pop."
Next "pick" is our new Christmas Paper "Pear and Partridge." Very pretty designs and the color scheme is phenomenal. Beautiful reds, greens and neutrals. And look...more flourishes!! The WOTG kit includes colorful sparkles and Glittery rub-ons. (which are more Shimmery than glittery. I love the size quality of our rub-ons)

Take your pages up a notch with these adorable matching rub-ons. Cute designs and easy to use. You'll be able to customize your pages with ease using the Pear and Partridge Compliments Glittery Rub-ons.

Artwork by our fantastic designers at CTMH!

Great designs to put together your Christmas pages or cards. The traditional patterns and colors are lovely and easy to work with.
I could just kiss whoever designed these Festive Velvet Rub-ons. They are gorgeous! So rich looking and striking. (The picture just does not do them justice.) They will add beauty to your cards or special Christmas photos and memories. Wait until you see them up close.  
I will be planning a Christmas card workshop with these Holiday chipboard dimensional elements. I really enjoy making my Christmas cards & I love hearing stories from my attendees about how the family member or friend on the receiving end enjoyed their card. It's so funny to hear them tell me that their "Mother in Law" didn't believe they actually made it themselves!

Monday, September 12, 2011

Scrapbook pages with "Typeset Paper Pack"

 
Awe...Isn't he cute! Seems like it was just last year he was in Preschool! He started 5th grade & is excited to be in the highest grade in his school. I guess he's "cool" now because he is one of the oldest! Pulling pictures like this out now is one of the reasons that I don't scrapbook conalogically. It's so much fun to pull these older photos out & ooooh & ahhh over them (maybe even cry a little because they are growing up so fast!) He's already asking me about Middle School. Jarred slow down will ya!
  
These "back to school" pages were created with a new paper kit "Typeset" from the Fall/Winter Catalog that was released on August 1. I'm really enjoying this paper pack. It's colors & style will go with any age or boy/girl. Plus as an added bonus there is beautiful generic patterns on the back of these B&T Dous. Wait until you see what I did with them. (Pages to be posted soon!)
 
I've been researching a new technique "clustering" I spent some time scouring the Internet & magazines for ideas. Our new Corrugated chipboard shapes are perfect for this. I'm having sooo much fun with them. There are 48 different shapes & sizes in a package. You can ink them, color them, paint them, stamp on them & more. Plus I love, love, love our new "Typeset Canvas Compliments." You know why??? Because they are not a sticker! They are printed on canvas and have awesome texture! What a great price too, $5.95 for 2 yes that's 2, 6" x 12" sheets.

As some of you know I find it hard to use stickers. I just don't like the texture. When I do use them I sand them, ink them, stamp on them & layer them so they look more like an embellishment & not a sticker. Otherwise they are so "flat" & one dimensional. That's why I so love these "Canvas Shapes!" They add instant detail & color to everything you use them on! Great for pages, cards & altered items. (especially teacher gifts!) Check out some of the stars, journaling spot & alpha cards below.


Join us on Friday Sept. 23rd for may workshop with this paper pack. We'll be creating 4 layouts & learning new techniques.
Here's a supply list:

BASIC KIT
ORDER #               PRODUCT                                                      PAGE #                   PRICE
Z1464                    Milepost Shapes                                           128                         3.95
X5907                    Light Green Cardstock Shade Pack            8                             7.95
                              TOTAL                                                                                            27.80
BETTER KIT 
1386                       Black Cardstock                                             8                           14.50
Z1393                     BackMini-Medley                                        127                         4.95
S1109                     SeptemberSOTM                                         140                         5.00
Z1463                     JustBlooms Flutter Paper Shapes             128                         5.95
                               TOTAL                                                                                            30.40

BEST
Z2165                    Juniper Ink Pad                                                9                              5.25
Z2163                    White Daisy Ink Pad                                        8                              6.95
Z2105                    Black Ink Pad                                                    8                              5.25
Z697                       Sponge                                                              132                         1.25
                                TOTAL                                                                                             18.70


Due to Labor Day weekend, Pink Friday & Fallasburg Fall Festival class will be held on Friday Sept. 23rd at 6:00. This class (only) will be at the Springhill Suites in Cascade (Behind Target on 28thstreet) 5250 28th Street, GRR, 49512. Future classes will be held at Lowell Arts Council on South Hudson, by the Fire barn & Mill. 

"Basic Kit” is necessary  for this class. “Better” & “Best” products are optional but may be used on the pages produced in class. We’ll be creating back to school & everyday moment’s pages at the crop. I'll be emailing the invitation out tomorrow with the supply list so you can order & have your product in time for the class.  Email me if you would like to be included in the invitation.

Call me with any questions 616-608-2653.

Jolene McCormick 
 
Posted by Picasa

Friday, May 27, 2011

My New Favorite Scrapbook Pages


This is by far one of my favorite layouts using the Miracle Paper Kit. I usually have a very hard time with angling photos & paper but this just came together like "Magic!" (No pun intended! Look on pages 62 & 63 for the sample pages & template) the left page is pretty much the same as the template but on the right page I used the template as a guideline & took a little artistic detour and added a chipboard butterfly & journaling strips on the upper corner & the matching Kraft Color Ready Border (I love these) on the right side instead of the left as in the book. I also carried the 2" (1 & 1/2 in the book) border to create movement across both pages it adds a subtle line to ease the eye to read from left to right & encompass both pages comfortably while taking in the creative details in the embellishments and not taking away the focus of attention to the photos (which are not there yet!). In the "Magic" How to Book the title is curved around the circle mat. I think that is where I will put mine once I chose the photos & have a topic!
Miracle Color Ready "Irrisistibles" Dimentional Elements
(Chipboard) 


As you all know I love chipboard! Especially Close to My Heart's as it is "Color Ready" so when you apply your medium with sponges, brushes, markers or direct to ink contact they accept it beautifully. Most chipboards are grey or brown like the back of a legal pad & are hard to get the right color because of the base. You either have to paint it white to start with or cover them with paper. Some are white but have a shiny surface which changes the color of the ink & can be difficult to add ink to because the surface is non-porous & the inks won't dry.With ours there are so many more options because they truly are "Color Ready" and take the ink the same way a piece of our White Daisy cardstock would.

The leaf & flourishes (did I tell you how much I love Flourishes!) under the the large flower were one piece that I cut. I used a sponge & inked it with Sweet Leaf. then take a clean paper towel & rub the ink off the "resist" area & it pops with an awesome design. Look how pretty the butterflies turned out! I love the flourishy (hmm... is that a word?), swirly pattern in the wings!
Add a few pearls or glitter glue for the body of the butterfly. Apply beads or sequins. Again because you are starting with a white color ready background you can add what ever color goes with your paper & watch the details on the chipboard come to life! For these butterflies I started with sunny yellow in the middle & worked my way out with Sweet Leaf next, Heavenly Blue, Crystal Blue & finally I tipped the edges of the wings in Dutch Blue.  You don't have to use all the inks but I think it adds depth the the butterfly &  gives a stunning effect. 
 The flowers are made with our new Scallop Punch. There are 3 layers of our B & T Dous (2 sided pattern paper) in the flower to the right. Crinkle each layer into a little ball & then smooth out, lightly add a little desert sand ink to each piece with a sponge & it will enhance the wrinkles and give a subtle distressed look. Add a glue dot to the center of the scallops to put it together. The top layer is cut down to a smaller circle. Vary the designs & colors you use in the layers for whimsical look. The center is a large pearl with little pearls surrounding it. Very Shabby Chic!

 This flower also uses the Scallop Punch. There are 5 pieces of Crystal blue cardstock & the bud uses 4 punched pieces of our B&T Dous (2 sided paper).  The 4 petals are folded creatively & attached to a cardstock scallop to make the bud. I could have stopped there but I wanted the flower to bigger so I added 4 more scallops of cardstock (sanded the edges & curled) & glued it all together with glue dots & added the chipboard leaf & swirl from the Miracle "Irresistibles" Dimensional Elements. All the circles are part of the same package as shown above. Gotta love that chipboard with the resist patterns!

   
We reproduced these pages at my WOTG class last month. The girls loved learning how to create the flowers & how simple they were to make. I think my love for chipboard is spreading! They were amazed at how easy they are to color & how much they bling up a page!                                                                          

Friday, February 25, 2011

Fresh & exciting new paper pack "Sophia"

Aren't these colors fresh & inspiring! While working with this paper I called my sister & said "You just can't create anything that's not beautiful with this paper!" The name of this paper pack is "Sophia" named after Jeanette Lynton's (CTMH CEO & owner) newest granddaughter.


I even stamped & cut out flowers & birds! I purchased the Sophia WOTG Kit. It includes an exclusive "B" sized stamp set, pink buttons & colonial white waxy flax. It has the most delightful stamp set with a bird designed with florishes in it! (And you all know how I love flourishes!) There's also flowers & vines & a charming bird cage.
Isn't this cupcake card "Cute!" Yes... I actually created a "Cute" card I like! (If you've stamped with me before you know I have a really hard time with "cute!") Our new 2" Scallop Circle Punch makes creating this whimsical card fun & easy.

This is my favorite card. I just love the bird & flowers it all came toghether beautifully.

Check out this new ribbon in our Designer Ribbon Pink Collection. Isn't it to die for! You all know how I love flowers. When I saw this I knew I had to get it right away! Wait until you see how I used on my scrap book pages. The journaling spot (frame) is from our new Sophia Level 2 Journaling Spots. Make sure to check back in a few days for a look at the pages you can create at my next WOTG class on Friday night, March 4th. Call or email to reserve your spot.

Sunday, June 14, 2009

It's the little details that make can difference

Often while sharing my albums with friends they ask "How do you get such good photos?" Well...I take a lot of pictures. Sometimes 60 at one game. By time you go through & delete blurred, missed shots & out of focus pictures your number of photos will be significantly diminished! I have found that to get that "just perfect" shot you have to keep clicking!
To get a lot of photos on one page cut them all the same size & film strip mat them. The same size photo gives the page a visual that is easy to read even though there is a lot to take in on it.
Posted by Picasa
Using the stamp set "Best Shot" I made the embellishments on these pages. Barn Red & Black ink stamped & distressed onto Bamboo CS are the colors shown. Stamp your images, cut them out & edge distress. Apply them to your page with pop dots for dimension or use fun embellishments that go with your theme or colors.
"LASSO night at the game" was created with one of my favorite tools...my label maker. Using clear label tape, type in what you want to say, peel it off & put it over (already edge distressed)CS. It's a quick easy way to journal and/or add a date, time or place to your layouts. Give it a try & let me know how it works for you!
Happy Scrappin!
Jolene

Tuesday, June 9, 2009

Using stickers on your layouts


Posted by PicasaI found a set of soccer stickers (Yes...stickers!) Those of you who have scrapped with me know that I don't usually care for stickers. One tip to using them is not to just "plop" them on a page as an embellishment. Before adding the stickers to white chipboard I punched circles out in bamboo CS the same size as the chipboard & edge distressed the CS with matching ink colors, the stickers are actually a little smaller than the chipboard. But the look is perfect. I love using chipboard, it adds dimension & pop to my pages. Plus you can do so many techniques with it. You can paint it, ink it, stamp on it, cover it with paper, add stickers & other embellishments to it & more!
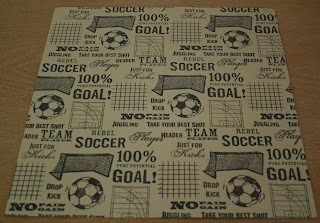
The soccer paper was stamped with "Best Shot" & distressed with black & barn red ink onto bamboo CS. Here's a picture of the stamped page before distressing. After choosing a layout I cut the CS into the sizes needed & distressed each piece separately.


"Catch some air" is also a sticker from the same set. One of my favorite kind, (That is if I have to use stickers!) it is clear, so when you apply it, the color of your background paper shows through. Having already picked a matching CS & distressing & matting it to match the page makes the sticker look like it belongs to the layout. Not to mention putting it next to a picture were my son is definitely getting some "air"! I love this photo! Jimmy plays with such intensity. He does not like to lose & does his best to help his team to a win.

Just a couple of more hints. Placing the "catch some air" sticker a little over the picture pulls the embellishment onto the layout instead of making it look like it was "plopped". The open spot on the diamond paper is were journalling can placed. The Barn Red CS is also stamped & distressed. I used film strip matting with the photos, it saves a lot of time & looks great.